Instructions for installing Anaconda Python (adapted from MIT's 6.00.1x)
If you are just starting out, the staff recommends that you download Anaconda as your Integrated Development Environment. But you are welcome to use any other IDE!
NOTE: Latest installation instruction can also be found from the official Anaconda website. We will try to keep this as up-to-date as possible but the instructions here may differ from what you actually experience.
This will cover how to set up Python and introduce you to Spyder, the Python development environment we will be using throughout this course. It will also show you how to check that the Python library packages matplotlib and numpy were successfully installed. They will be used later in this class to work with plots.
Downloading the Python Installer
To download the free “Anaconda” Python distribution created by Contiuum Analytics:
- Visit the download page for Contiuum Analytics.
NOTE: the installer we’ll be downloading and installing is larger than the average file, because it contains Python, associated packages, a code editor, and some other toys. It may take 15-20 minutes in total to download and install when executing the commands.
- You will be downloading the Python 3.5 version. If you download Python 2.7, your code may be incorrect to our graders.
- Windows Operating System: Scroll to the "Anaconda for Windows" section. Look in the column with Python 3.5. There are two versions of the installer, one for 32-bit Windows, and one for 64-bit Windows. Microsoft provides instructions here to determine (relatively easily) if you have a 32 or 64-bit setup. If you are running 32-bit Windows, be sure that you select the 32-bit version, and if you are running 64-bit Windows, you can download either version.

- Macintosh Operating System: Scroll to the "Anaconda for OS X" section. Look in the column with Python 3.5. There is only one version of the installer: the 64-bit version. Contiuum does not offer a 32-bit installer for Macintosh, since Macs post-2011 are 64-bit only (and post-2007 are 64-bit compatible).

- Linux Operating Systems: Scroll to the "Anaconda for Linux" section. Look in the column with Python 3.5. You can look here for how to determine your version 32-bit or 64-bit.

Installing Python and Spyder
- To install Python after downloading the graphical installer, double click the .exe (Windows) or .pkg (Mac) file and follow the instructions on the screen. There are some additional notes and comments on installing/uninstalling Python on Contiuum’s website here.
- Note that Contiuum’s Python distribution should (per their quick start guide) install cleanly into a single directory, should not require Administrator or root privileges, and should not affect other Python installs on your system (if you have any), or interfere with OSX Frameworks. Let us know in the forum if you’re having any issues, so that others can learn along with you.
- When installing Anaconda, a pop-up menu may ask whether or not to “Add Anaconda to my PATH environment variable”, and “Register Anaconda as my default Python 3.5.” We suggest accepting both options for the purposes of this class.

- The installation will take about 15 minutes. Click Finish to close the window when done.
Starting Spyder, a code editor
When you download and install the Anaconda distribution of Python, you are getting several tools related to Python development. One of the tools is Spyder (Scientific Python Development Environment), an integrated development environment useful for writing, running, and debugging code. There are two primary ways to access the tools and open Spyder:
- Windows Only: The Anaconda folder from the Start menu.
- The Anaconda Navigator shortcut icon.

Both should open the Anaconda Navigator. Click here to read more about its features. We will only be using one app from Anaconda in this class: Spyder. Click the blue “Launch” button by “spyder” to launch Spyder. It should take a moment to load and may appear to pause for a minute or two.

Spyder Application Overview
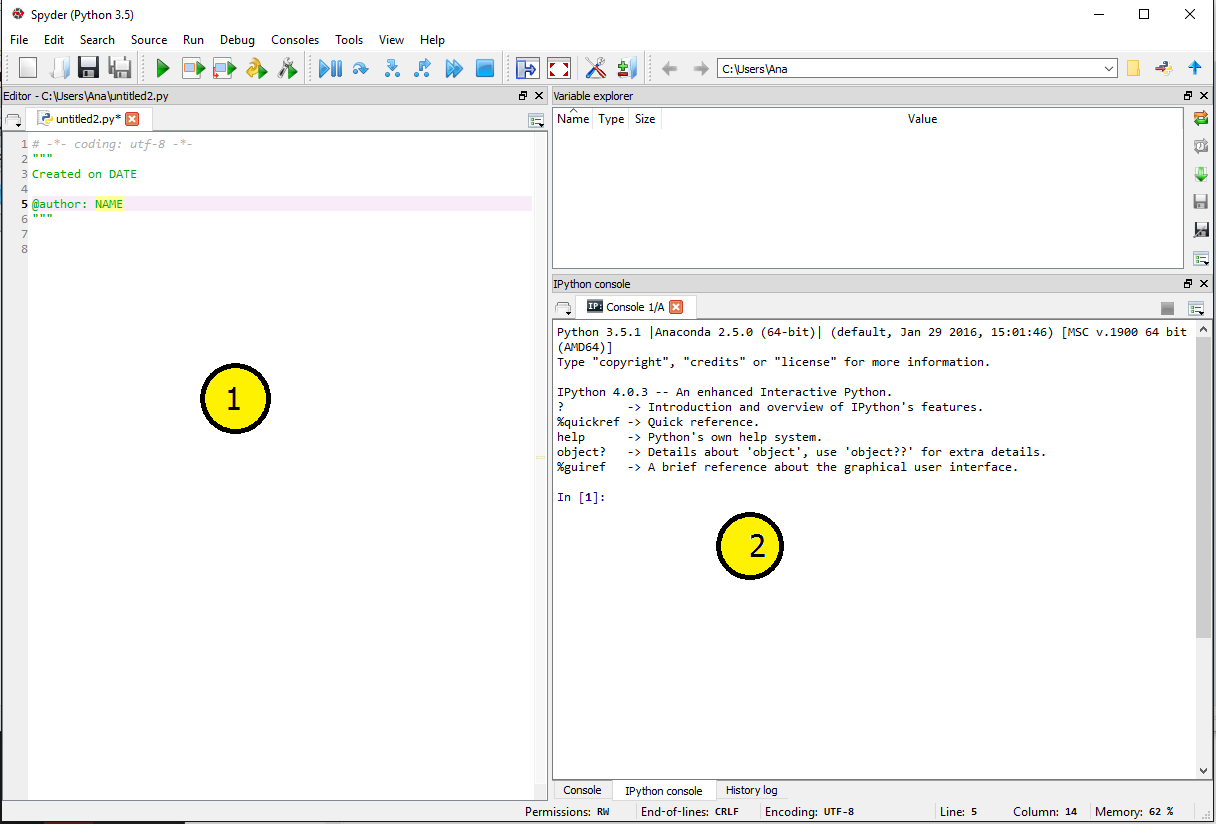
Opening the Spyder application should present you with the following window (screenshot is from Mac OS X, but are similar in Windows and Linux). This window contains two commonly used parts, among others:
- Code Editor that lets you create and edit existing Python source files [YELLOW CIRCLE 1]
- IPython interpreter pane, which gives you access to the Python interactive mode [YELLOW CIRCLE 2]
During the following discussion of Spyder’s features, you should start Spyder and try to replicate the screenshots.
Using the IPython prompt:
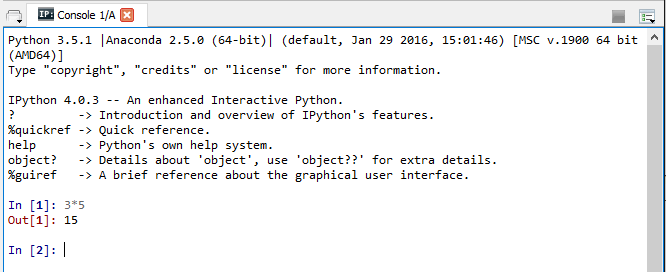
- The IPython prompt looks something like this: “In [1]:”, and can be used to run Python code. You can type Python code directly into this prompt, and pressing enter executes the code fragment. The result of the computation is preceded by the words "Out []".
- Try typing the following after the prompt and pressing the enter key:
3*5
Using the IPython prompt – examples and exercises:
Addition (+), subtraction (-), multiplication (*), division (/), modulo (%) and power (**) operators are built into the Python language. This means you can use them right away. If you want to use a square root in your calculation, you can either raise something to the power of 0.5 or you can import the math module. Do not worry about what it means right now, we will cover this later during the course. Below are two examples of square root calculation:
In [1]: 16**0.5
Out [1]: 4.0
In [2]: import math
In [3]: math.sqrt(16)
Out[3]: 4.0
The math module allows you to do a number of useful operations:
In [1]: math.log(16, 2)
Out [1]: 4.0
In [2]: math.cos( 0 )
Out [2]: 1.0
Exercises: Use the IPython prompt to calculate:
(these are just for practice, solutions will not be graded or collected)
- 6+4*10
- (6+4)*10
(Compare this to the previous one, and note that Python uses parentheses just like you would in normal math to determine order of operations!)
- 23.0 to the 5th power
- Positive root of the following equation: 34*x^2 + 68*x - 510
Recall: given a*x^2 + b*x + c,
then x1 = (-b +sqrt(b*b - 4*a*c))/(2*a)
- import math
math.cos(3.4)**2+math.sin(3.4)**2
To create, save, and run a file
Creating the file
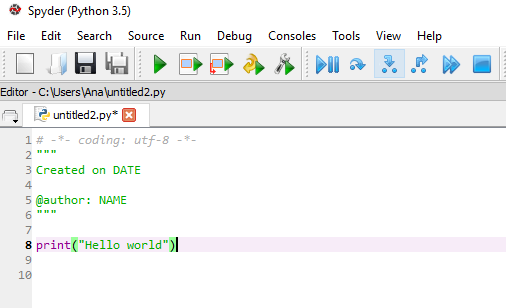
- In Spyder’s File menu, select "New file".
- In the new file, type the following:
print('hello world')
Saving the file
- Saving your files in a location specific for this course can aid in organization. To do that, first create a directory (or folder) for your 6.00.1x material, with an appropriate name.
- Now you can save your "hello world" file in the new folder that you just created.
- From the Spyder File menu, click “Save As” and then navigate to your course folder before typing a name for this file, e.g., "hello". Make sure that you’re saving the file as type Python (see below for images on Mac and PC).
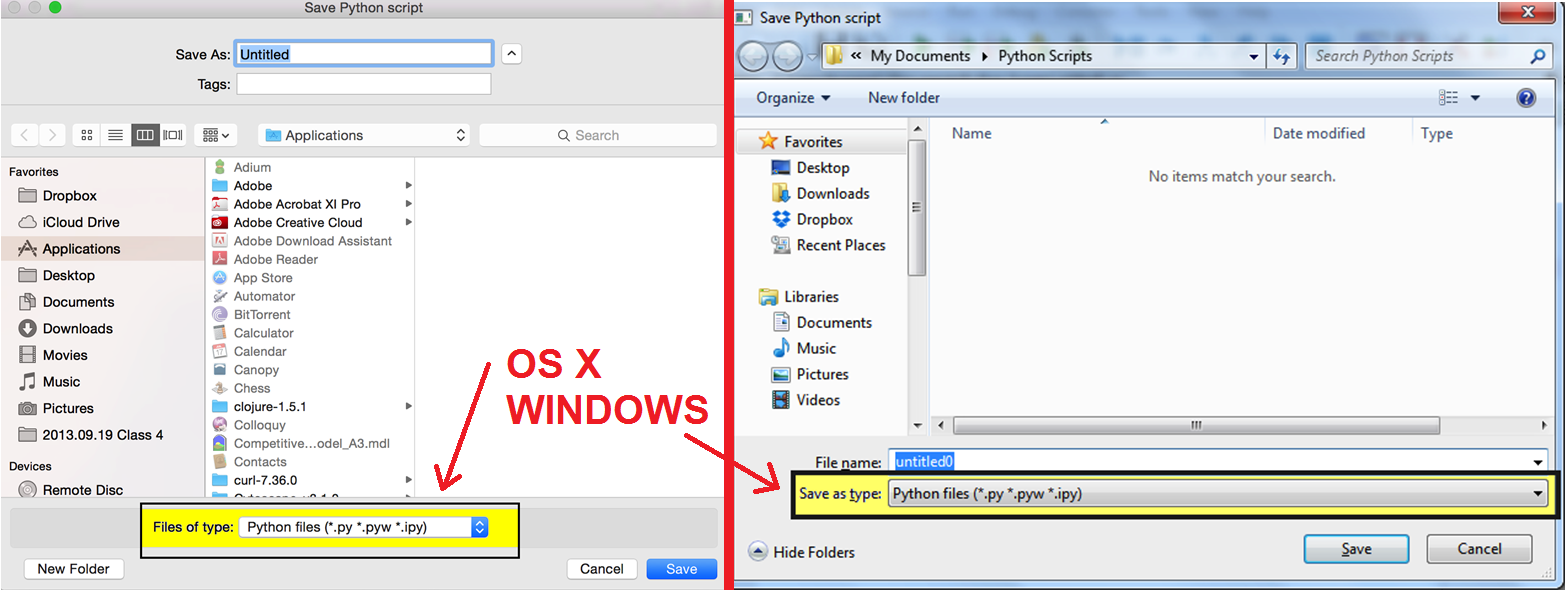
- Click the Save button
Running the file
- From within Spyder, go to the “Run” menu, click on "Run".
- You should see two parts to the output in the IPython console. First, The runfile(…) line shows you the filepath on your computer for the file you just ran. Second, the output of the file, “Hello world”, should appear.
- Go back to the Code Editor and add the following line: print('I like 6.00.1x!')
- Select “Run File” again (you can also use the green triangular Run button on the toolbar or the shortcut F5), and observe the change in result.
- Close your test file by clicking the X in its filename tab.
- Now reopen your test file by double-clicking its name in the File menu’s "Open recent" option.
- Congratulations - your Python environment has been installed, and you now know how to enter expressions in Python and how to save, run, and open files!
- For additional help on Spyder, go the Help menu within Spyder, and select the “Spyder tutorial” option.
Installing and Testing Matplotlib and Numpy
To work with plots, you will need these Python library packages: matplotlib and numpy. You will not need these packages until the end of the course but we encourage you to download them early.
If you’re using Anaconda Python, your system should already have numpy and matplotlib installed. Start Spyder and type “import numpy” and “import matplotlib” into the prompts.
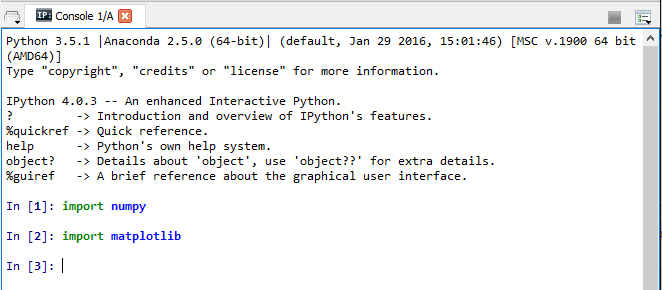
If no errors show up, you already have them installed. If errors show up, reach out via the forum!